


 5 Reasons Why Your Business Needs a Mobile eCommerce Application
 Using Salesforce to Improve Your Sales Pipeline: Five Tips
 Cross-Platform Mobile Development: Five Best Frameworks
 How to Develop Custom Accounting Software
 10 Best Web Development Frameworks in 2024
In this blog post, I will describe how to resolve the issue when your encoded Sitecore License is too big to be placed into the Azure DevOps variable to be consumed by Kubernetes as a secret value. In two words, we will use the Kubernetes persistent volume as an Azure File share.
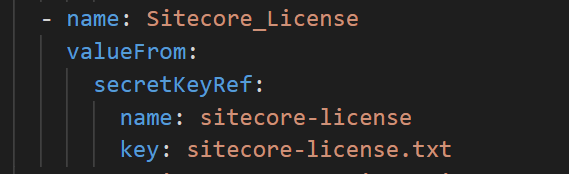
As we know, the Sitecore license file is passed to the container as an environment variable (called Sitecore_License) in the encoded string form. In Kubernetes, we usually put this encoded value into a secret file; for instance:

We store and manage all Sitecore K8S specifications in source control, and the secrets are no exception. For security reasons, keeping secrets in source control is bad practice. In a project I was involved in, we used the Azure DevOps variable group to define all secrets.
Unfortunately, the Sitecore License secret is too big to be kept as an Azure DevOps variable. It says: “Length of variable `SITECORE_LICENSE` is invalid. It must be between 0 and 4096 characters.”

One solution is to store the license secret in the Azure key-vault. But I would like to introduce another solution — Kubernetes Persistent Volumes (volumes defined and created as part of the pod lifecycle only exist until you delete the pod).
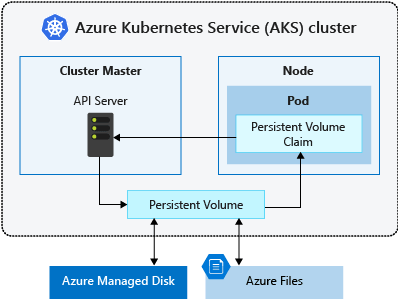
Source: Microsoft
Kubernetes supports different types of volumes and one of them is Azure File persistent volume. This means we can create the Azure File Share, put the Sitecore license file into and mount it as a Kubernetes volume. The following algorithm shows how to do that:
Step 1. Create a resource group (sugbelarus1 in my sample).
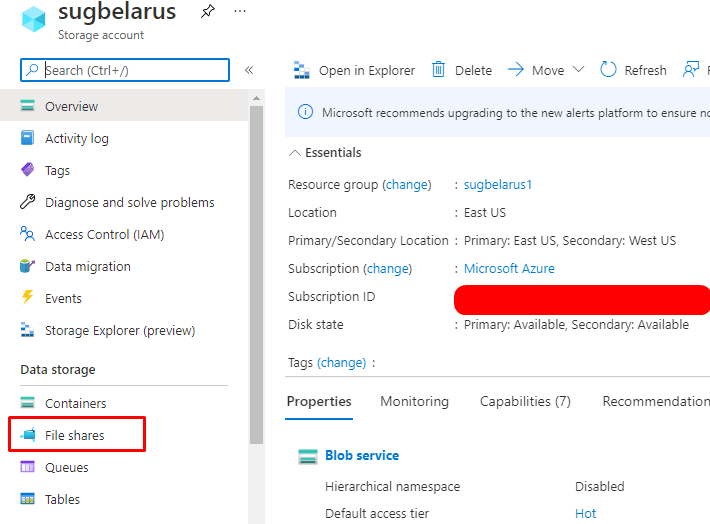
Step 2. Create a storage account (sugbelarus in my sample).
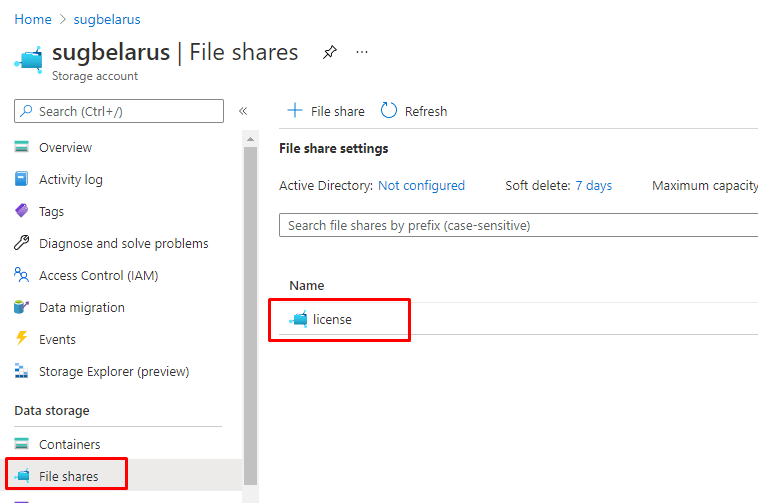
Step 3. Create the Azure File Share (license in my sample).
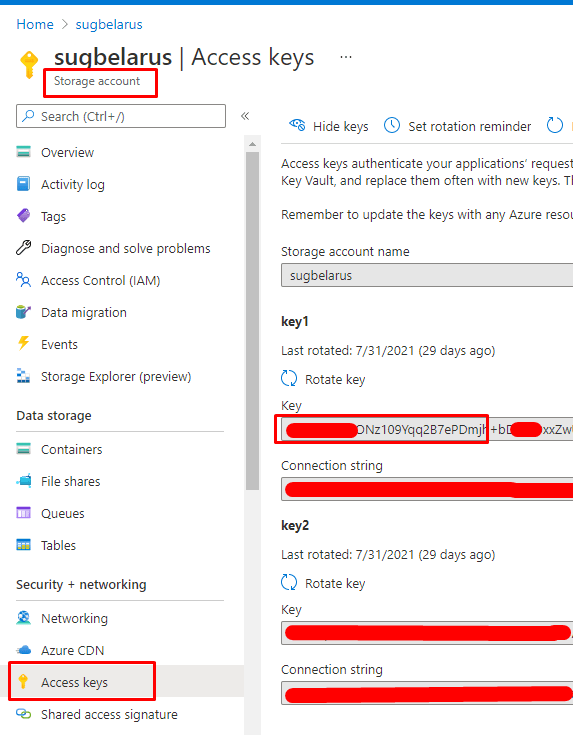
Step 4. Get the storage account key.
All these steps could be completed via Azure CLI.
# Change these four parameters as needed for your own environment
AKS_PERS_STORAGE_ACCOUNT_NAME=sugbelarus
AKS_PERS_RESOURCE_GROUP=sugbelarus1
AKS_PERS_LOCATION=eastus
AKS_PERS_SHARE_NAME=license

# Create a resource group
az group create --name $AKS_PERS_RESOURCE_GROUP --location $AKS_PERS_LOCATION

# Create a storage account
az storage account create -n $AKS_PERS_STORAGE_ACCOUNT_NAME -g $AKS_PERS_RESOURCE_GROUP -l $AKS_PERS_LOCATION --sku Standard_LRS

# Export the connection string as an environment variable, this is used when creating the Azure file share
export AZURE_STORAGE_CONNECTION_STRING=$(az storage account show-connection-string -n $AKS_PERS_STORAGE_ACCOUNT_NAME -g $AKS_PERS_RESOURCE_GROUP -o tsv)

# Create the file share
az storage share create -n $AKS_PERS_SHARE_NAME --connection-string $AZURE_STORAGE_CONNECTION_STRING

# Get storage account key
STORAGE_KEY=$(az storage account keys list --resource-group $AKS_PERS_RESOURCE_GROUP --account-name $AKS_PERS_STORAGE_ACCOUNT_NAME --query "[0].value" -o tsv)

# Echo storage account name and key
echo Storage account name: $AKS_PERS_STORAGE_ACCOUNT_NAME
echo Storage account key: $STORAGE_KEY
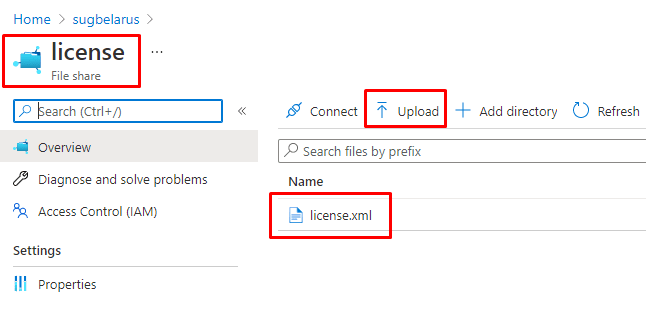
Step 5. Upload the Sitecore license file.
Step 6. Create a Kubernetes secret.
Kubernetes needs credentials to access the file share created in the previous steps:
kubectl create secret generic azure-secret
--from-literal=azurestorageaccountname=$AKS_PERS_STORAGE_ACCOUNT_NAME
--from-literal=azurestorageaccountkey=$STORAGE_KEY
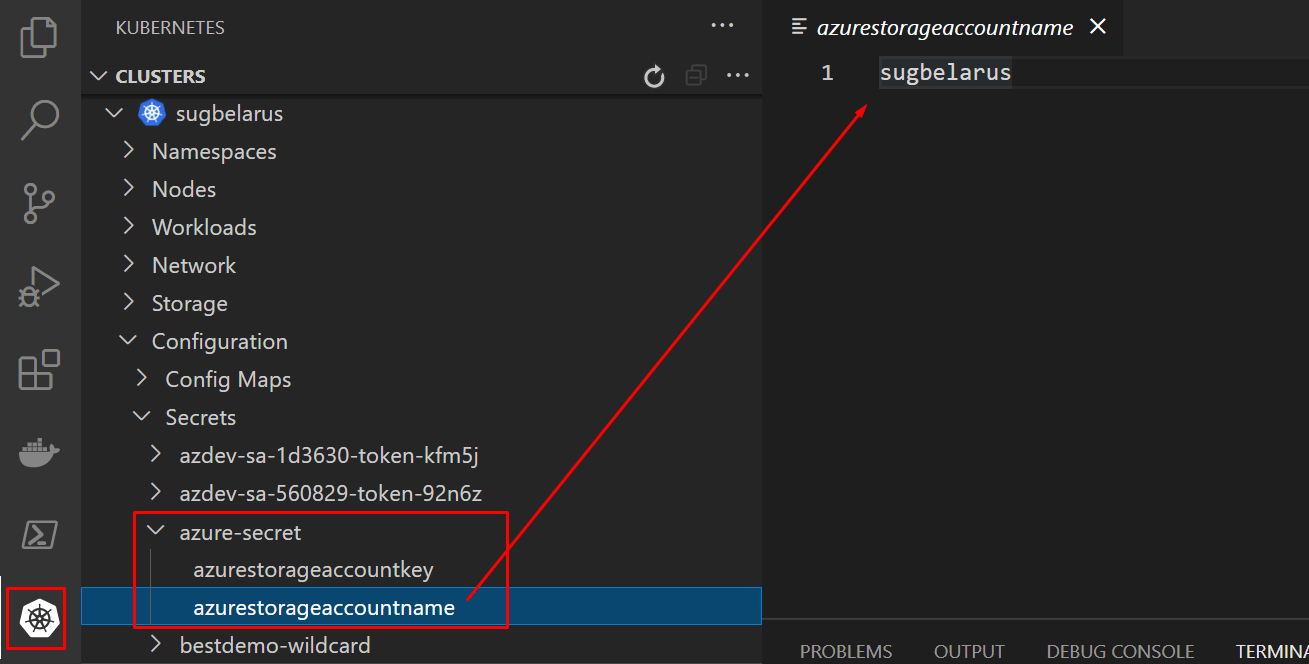
Run the kubectl get secrets command to validate if a new secret was created.

You can also validate via Visual Studio Code using the Kubernetes extension.
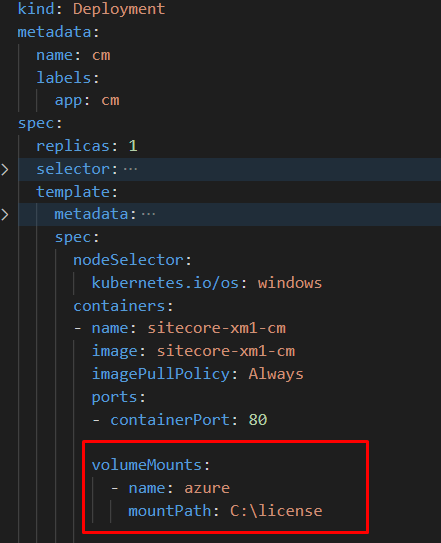
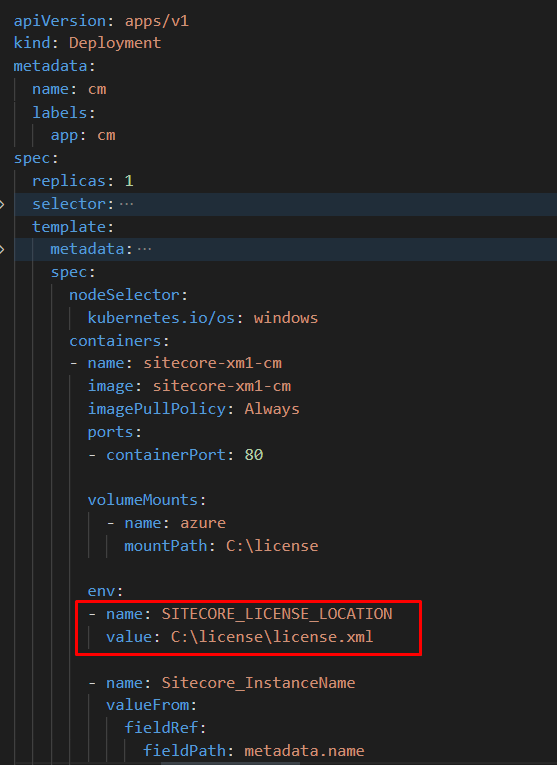
Step 7. Configure the volume in the container specification; for instance, cm.yaml file.
- Define the volumeMounts section:
- Define the Volume section.

- Define the SITECORE_LICENSE_LOCATION environment variable (from Sitecore 9.X you can use this variable to configure the license location).
Step 8. Deploy updated specification (kubectl apply command) and exec the updated pod.
kubectl exec --stdin --tty cm-854986576d-l2cls
Where cm-797498f98d-lj6bz – pod name (run kubectl get pods command to get the name)
Make sure you can find the license file where you mounted it.
That’s it for today! Happy voluming, everyone!

Vadzim Papko is a Sitecore MVP, Sitecore Architect and Chief .NET Technologist at SaM Solutions. Adhering to the principles of non-stop self-development, he devotes himself to Sitecore innovation and popularization. Follow him on Twitter @VadzimPapko and subscribe to his Telegram channel Amazing Sitecore @amazingsitecore


![Sitecore Experience Manager Cloud (XM Cloud) [Complete Guide]](https://www.sam-solutions.com/blog/wp-content/uploads/2022/11/Sitecore-Experience-Manager-XM-Cloud.png)
![Why You Should Upgrade to Sitecore 10 [including the Sitecore 9 vs. 10 comparison]](https://www.sam-solutions.com/blog/wp-content/uploads/2022/09/Why-upgrade-to-sitecore-10.png)


![[TechSpeak] Migrating a Legacy Solution to Helix Architecture: a Step-by-Step Guide](https://www.sam-solutions.com/blog/wp-content/uploads/2021/02/Migrating-to-Sitecore-Helix-Architecture-image-1-1024x660-min.png)


