


 5 Reasons Why Your Business Needs a Mobile eCommerce Application
 Using Salesforce to Improve Your Sales Pipeline: Five Tips
 Cross-Platform Mobile Development: Five Best Frameworks
 How to Develop Custom Accounting Software
 10 Best Web Development Frameworks in 2024
In 2011, Amazon extended the functionality of its cloud with a new service — AWS Elastic Beanstalk, which simplifies the lives of companies that use Amazon Web Services (AWS). Since then, numerous companies deploy applications using Elastic Beanstalk to facilitate the deployment and scaling of their web workloads. In this article, we will explore the key features and benefits of the service, key deployment considerations and four steps it takes to deploy applications using Elastic Beanstalk.
Drive your digital transformation to the next level with our world-class cloud development services
The Purpose and Core Capabilities
Since its emergence in 2011, more than 19,000 websites have come to rely on this service. What is AWS Elastic Beanstalk and what does it do?
The Core Characteristics of AWS Elastic Beanstalk
AWS Elastic Beanstalk encompasses processes and operations connected with the deployment of web apps into the cloud environment, as well as their scaling.
Elastic Beanstalk automates the deployment by putting forward the required capacity, balancing the load, autoscaling and the monitoring of software efficiency and performance. All that is left for a developer to do is to apply the code. In these conditions, the application owner has overall control over the capacity that AWS provides for the software and can access it at any time.
How does it work? It manages a number of AWS services, such as S3, EC2, Elastic Load Balancers, autoscaling, etc., by providing a special abstraction layer over the server and the operating system. However, users see it as an off-the-shelf set of the platform and the operating system, for example, 64bit Amazon Linux 2014.03 v1.1.0 that is based on Ruby 2.0.
Below are some of its configuration specifics:
- Supports Apache, Passenger, Internet Information Services (IIS) and Nginx servers and Java, PHP, .NET, Python, Go and Ruby programming languages
- Supports a Puma or a Passenger app stacks for Rails
- Configures an SQL server via Amazon RDS
- CloudWatch-based server monitoring
- AWS CLI-based deployment of new versions
Deployment based on Elastic Beanstalk requires the definition of a number of components, such as an “application,” a “version,” a “configuration template” and an “environment.” An application is a project logical container, a version is its deployable built and a configuration template contains configuration-related information for the software and the Elastic Beanstalk environment. As for the environment, it brings together a configuration and a version and deploys the two components.
Reasons to Deploy Apps in Elastic Beanstalk
Mastered to facilitate deployment to AWS, Elastic Beanstalk has significant advantages that help businesses improve their efficiency. They are :
Quick server configuration. Owing it to automation, Elastic Beanstalk allows companies to create a web service in practically no time. Users just upload their codes and enjoy a smoothly running web service in less than one hour while the service performs the setup, configuration and delivery of other AWS services.
In such a manner, developers save a lot of time, as they do not need to handle numerous components and tasks required to build a web app. So, database setup, Linux package installation, Load Balancer configuration and many other operations are the responsibility of Elastic Beanstalk. Also, it helps avoid errors that a developer can make since everything has been already taken into consideration by the vendor and there is no chance of missing anything.
Flexibility and ample opportunity for customization. Elastic Beanstalk allows developers to keep everything under the radar, as it is AWS’s service. It also enables easy updates and modifications. In addition, users can choose the size of their instances or increase the number of frontend servers, which allows them to match the load and server needs.
Free-of-charge basis. If a company already uses AWS, it is only charged for AWS resources that enable storage and the operation of applications, while the other functionality is free. The built-in autoscaling of Elastic Beanstalk enables cost-saving by adding extra servers.
Enhanced security. Elastic Beanstalk also reaps profits from the fact that AWS steps up the security policy. For example, the peculiarity of server configuration allows servers to communicate only when it is required, while a developer may find this adjustment to be quite difficult to do manually.
Unfortunately, this service is not without certain disadvantages: higher deployment reliability wouldn’t go amiss, as well as higher transparency and more comprehensive documentation.
Deployment Considerations
The fact that companies deploy applications with AWS Elastic Beanstalk for further use in the cloud makes them consider and follow specific conditions to ensure powerful performance and high reliability of workloads.
Scalability
Whether it is scaling in or scaling out, scalability is an indispensable prerequisite of an efficient cloud infrastructure. Companies can achieve it by making the most of cloud elasticity, which means that they are able to easily acquire or release resources depending on their requirements.
If configured properly, Elastic Beanstalk leverages cloud elasticity by automatic scaling up or scaling down in response to a specific situation based on resource metrics from your environment. Autoscaling functionality allows companies to vary capacity against usage fluctuations.
When possible, applications deployed by Elastic Beanstalk should be stateless and based on loosely coupled resilient components that support easy scaling out.
Fault-Tolerance
When designing any software that is to be deployed in the cloud, the key is to foresee possible outages and aberrations and make an app ready to withstand them. That is why developers should always consider automatic failover and design, and implement and deploy having this consideration in mind.
To enable it, use Availability Zones for Amazon RDS and Amazon EC2 instances, Amazon CloudWatch for better visibility into software performance parameters, and react accordingly to possible abnormalities. Also, certain auto-scaling settings allow Amazon EC2 to maintain a fixed number of its instances so that damaged ones are replaced by healthy instances. Regular automated backups is another important feature that allows Amazon RDS to secure against data loss.
Connectivity
To ensure faultless deployments, Elastic Beanstalk requires proper connectivity with instances in the environment. Depending on the type of Amazon VPC environment, the configuration should be as follows:
- Single-instance environments: additional configuration is not required, as Elastic Beanstalk provides every instance with a public IP that allows them to access the Internet directly
- Load-balancing, auto-scaling environments that have one public subnet: additional configuration is not required as all instances are assigned a public IP address for Internet access
- Load-balancing, auto-scaling environments that have public and private subnets:
- Make a load balancer in the public subnet to route downstream traffic from the Internet to instances
- Create a net address translation device to route upstream traffic from instances to the Internet
- Develop downstream and upstream routing rules for instances that are within the private subnet
- Set security groups for the net address translation device and other instances, which enables Internet communication
Security
While AWS is in charge of the security of the physical facilities that are part of the environments, companies are in the first instance responsible for data quality and security. That is why, to protect data that their applications exchange with clients, companies need a proper SSL configuration.
It enables the encryption of data that is transmitted between the Elastic load balancer and clients, as by default the traffic between instances and the load balancer are not encrypted.
Persistent Storage
Due to their specifics, Amazon EC2 instances do not have persistent local storages, which is why they are not saved in the file system after their termination, and new instances start by default. To avoid this, businesses need to create their applications in such a manner that they can store data in persistent storages, which AWS provides in a great number.
Regular Upgrades
Although Elastic Beanstalk makes regular updates of platform configurations, it does not provide that of running environments. So, it is the responsibility of each specific company to keep their running environments up to date.
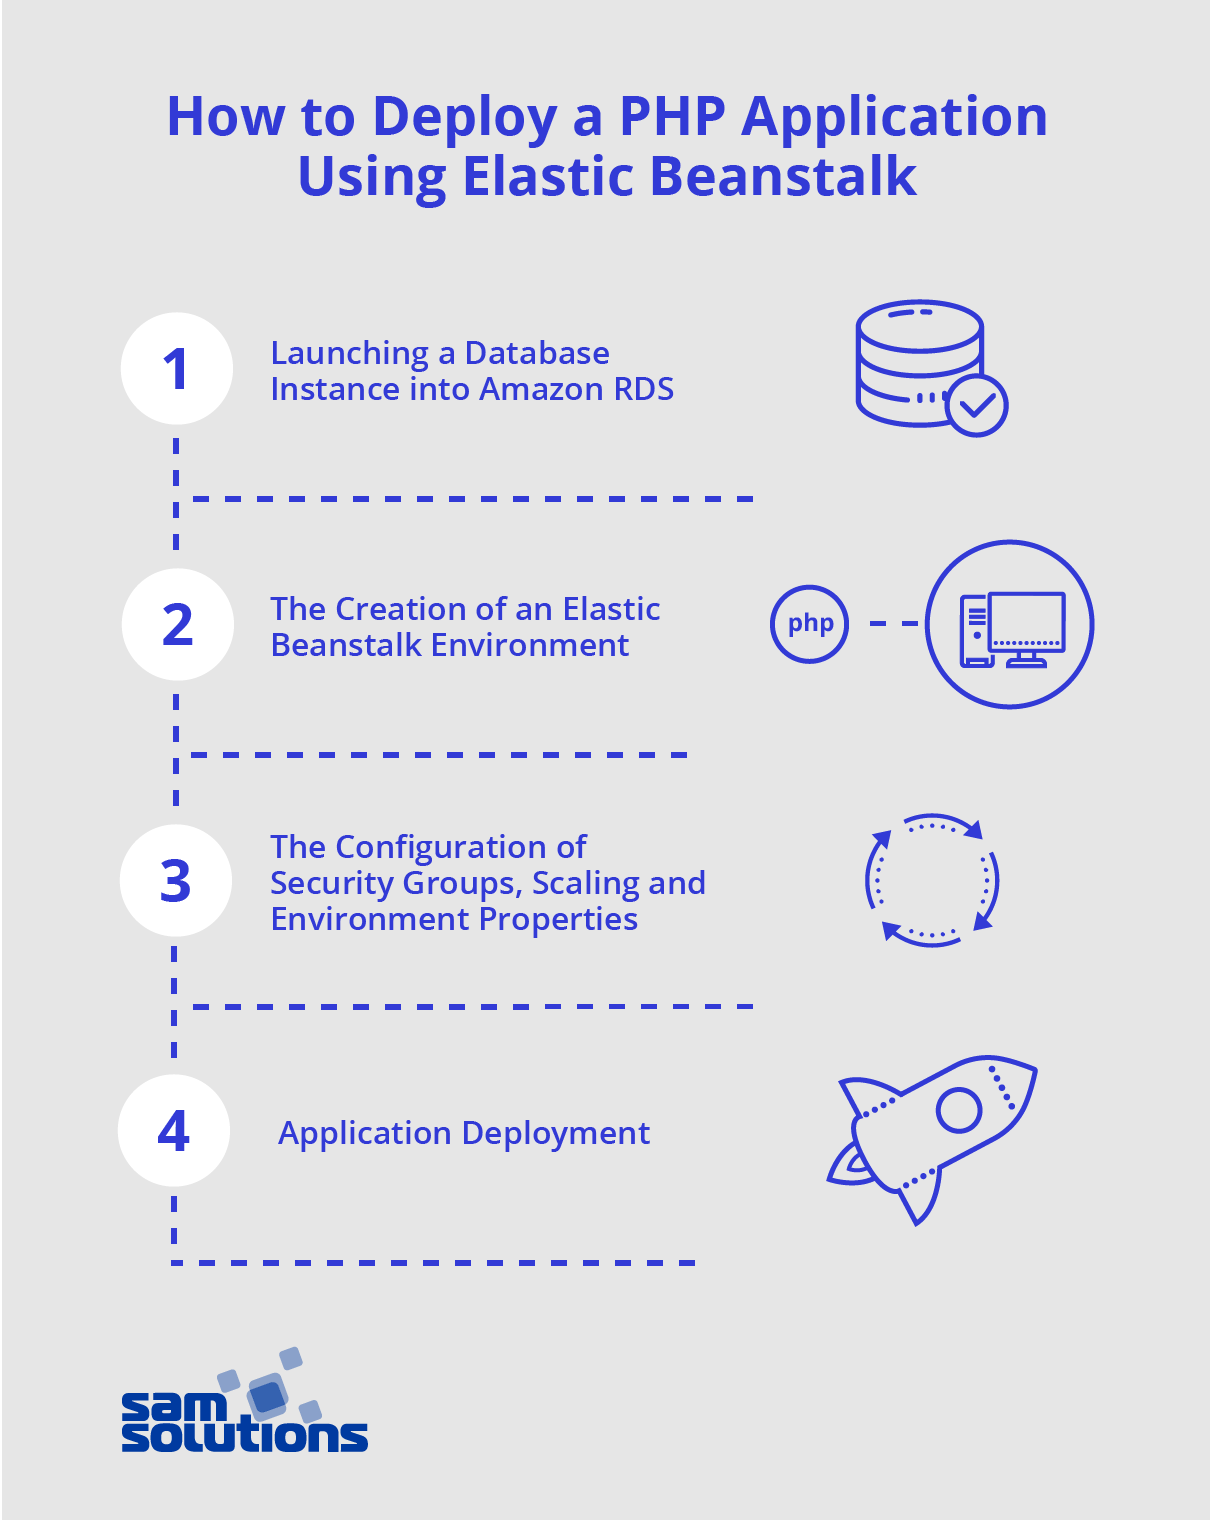
How to Deploy a PHP Application Using Elastic Beanstalk
After companies have made sure that they meet all of the requirements from the above checklist, they can proceed to the deployment itself. By way of example, we’ll explore how to deploy a PHP application to AWS Elastic Beanstalk. However, as mentioned above, an app can also be written in Java, .NET, Python, Go or Ruby.
To provide ultimate accuracy and truth in relation to the process details, the below guideline is closely based on Amazon’s tutorial. In this specific case, we mean a sample PHP app that stores text data in a MySQL database, and resources are launched in a default Amazon Virtual Private Cloud.
1.Launching a Database Instance into Amazon RDS
Launching a database instance into Amazon RDS is a prerequisite for the use of an external database together with an app that runs with the help of Elastic Beanstalk. Make sure that you choose a Multi-AZ MySQL database instance in the Amazon RDS console to enable successful database failovers if its instance goes out.
To launch an RDS database instance in a default VPC, developers need to perform the following operations:
- Open the Amazon RDS’s console.
- Choose “Instances” -> “Launch DB instance” -> database engine -> “Next.”
- If prompted, choose a use case.
- In “Specify DB details,” adjust the required settings. Focus on “DB instance class” to select instance size that fits your memory and CPU power requirements and set “Create replica in different zone” in “Multi-AZ deployment” to enable high availability. Then, select “Next.”
- Input ebdb as the database name, under “Database options.”
- Adjust other default settings if required and press “Launch DB instance.”
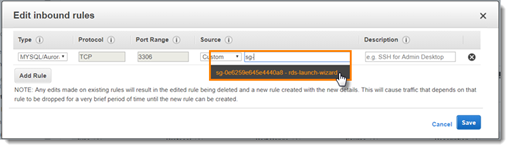
After you have finished it, change the security group to allow downstream traffic to access only a specific port. This rule provides access permission to all of the security group resources. There is a scenario to modify the access rules:
- Open the console and select “Instances”
- Choose the instance name to get details about it
- Under the section “Security and network,” there is the DB instance-associated security group. Follow the link to view it in the EC2 console.

- In the details of the security group, choose “Inbound” -> “Edit” -> “Add Rule”
- Select your database engine as a type
- Input sg- to see available security groups and select the current one to enable its resources to get traffic from other group resources
 7. Save

 7. Save
2. The Creation of an Elastic Beanstalk Environment
The development of an Elastic Beanstalk environment is performed with the use of the AWS Management Console, where you should choose the PHP platform and accept settings by default and a code. Open the Elastic Beanstalk console with a preconfigured link:
- Select a platform that uses the required language
- Select “ Application” as an app code
- Select “Review and launch” and check available options
- Press “Create an app”
During this process, EC2 instance, instance security group, load balancer, load balancer security group, autoscaling group, Amazon S3 bucket, Amazon CloudWatch alarms, AWS CloudFormation stack and the domain name are created. The termination of Elastic Beanstalk means that all of these resources are terminated.
3. The Configuration of Security Groups, Scaling and Environment Properties
To create another security group in the environment, you should do the following:
- Open the Elastic Beanstalk console and find the management page of your environment
- Select “Configuration” and choose “Modify” for “Instances”
- Select the required security group that you need to attach to the instances and apply
- After reading the warning, press “Confirm”
To send the connection data to your environment, you will need the environment properties. For their configuration, put through the following steps:
- Open the Elastic Beanstalk console and find the management page of your environment.
- Select “Configuration” and choose “Modify” for “Software.”
- In “Environment properties,” provide data that your app will use for the creation of a connection string. To ensure that the environment is compatible with environments with RDS DB instances, use the following information:
| RDS_HOSTNAME | Database instance hostname
* Endpoint – for Amazon RDS console label |
| RDS_PORT | Database instance connection port
* Port – for Amazon RDS console label |
| RDS_DB_NAME | Database name, ebdb.
* DB Name – for Amazon RDS console label |
| RDS_USERNAME | Database user name
* Username – for Amazon RDS console label |
| RDS_PASSWORD | Database password |
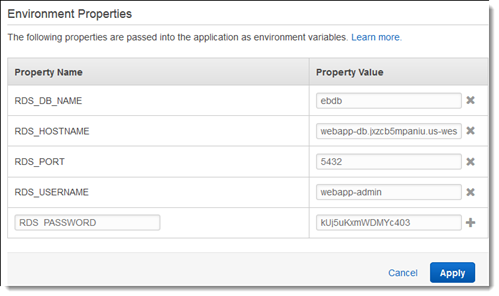
- Apply
To ensure high scalability of your environment, create an auto-scaling group that includes at least two instances:
- Open the Elastic Beanstalk console and find the management page of your environment
- Select “Configuration” and choose “Modify” for “Capacity”
- Select “Min instances” in the “Auto Scaling Group” and set two (2)
- Apply
Read also: Best Cloud Computing Service Providers
4. Application Deployment
Finally, your environment is ready for running the application and for the connection to Amazon RDS. All that if left to do is to deploy an app in the environment:
- Open the Elastic Beanstalk console and find the management page of your environment
- Select “Upload and Deploy”
- Select “Choose File” and choose the source bundle with the dialog box
- Deploy and select the URL to open the new website
We develop innovative cloud-based solutions for clients around the world
To Use or Not to Use Elastic Beanstalk?
While the decision on whether or not to deploy apps to Elastic Beanstalk is up to each specific business, this service definitely has considerable advantages. If applied correctly, it helps accelerate and streamline app relocation to the cloud.
However, to avoid errors, prevent incidents and successfully deploy apps, companies should closely follow vendor recommendations or turn to service providers who are well-versed in AWS, such as SaM Solutions. Extensive expertise in the domain allows such companies to create fault-tolerant cloud infrastructures and provide robust operation of web apps.

A content writer at SaM Solutions, Yuliya is anxious to create and deliver relevant experiences. She evangelizes corporate knowledge on expertise and innovations that the company provides.


![[Tech Talk] What Developers Should Know About SQL Optimization, Part 1: Fundamentals](https://www.sam-solutions.com/blog/wp-content/uploads/fly-images/30279/SQL-video-cover-370x238.webp)


 Why React and Node.js Are the Top Technologies for Creating High-Performance Web Apps in 2024
 10 Best IoT Platforms for 2024
 Top 20 Latest Trends in the Ecommerce Industry in 2024
 Top 10 Most Popular Programming Languages in 2024
Great items from you, man. I can not wait to read far more from you. This is really a great site.
Thank you for sharing your thoughts. I truly appreciate your efforts and I am waiting for your next post thanks once again.
What I like about this AWS service is its fast learning curve due to the intuitive interface and a range of useful training materials. It certainly has some disadvantages but in general, Elastic Beanstalk is the right tool for those who want to reduce system operations and streamline the deployment process.
With the help of Elastic Beanstalk, we managed to run our application code within a few minutes, just like magic. This service is definitely worth your attention.
AWS Elastic Beanstalk allows developers to easily get their ideas online, they don’t have to worry about managing resources, so you can ensure rapid software development. Moreover, it supports various programming languages, so you are free to choose.
Elastic Beanstalk is an easy-to-use service for app deployment and scaling. I had the experience of working with this service and can say that it significantly improves the efficiency of the development team.
Your overview is super clear and comprehensive. It’s always a pleasure to read articles that provide you with useful insights, and this blog post is one of them. Many thanks.
Hi there! I could have sworn I’ve visited this site before but after looking at a few of the posts I realized it’s new to me. Anyways, I’m certainly delighted I came across it and I’ll be bookmarking it and checking back often!
It’s a shame you don’t have a donate button! I’d definitely donate to this outstanding blog!
I guess for now i’ll settle for book-marking and adding your RSS feed to my Google account.
I look forward to brand new updates and will talk about this site with my Facebook group.
Talk soon!
Thanks for any other informative site. The place else may I am getting that kind of info written in such a perfect means? I have a mission that I’m simply now working on, and I have been at the glance out for such info.
Thanks a lot for sharing this with all people you actually know what you are talking approximately!
Good way of describing, and good post to take data regarding my presentation topic, which i am going to deliver in academy.
Good day! This is my 1st comment here so I just wanted to give a quick
shout out and tell you I really enjoy reading your blog posts.
I constantly emailed this weblog post page to all
my associates, as if like to read it then my friends will too.
Thanks so much for the post.Really thank you! Keep writing.